| Make sure you ground yourself before starting the installation to get rid of any static buildup you may be carrying. Touch a piece of metal before you go to do the installation |
|
| You must bend the metal shield on the circuit board back to expose the solder points, this is the easiest way to do it. Then just bend it back when you are done. Some people prefer to desolder the whole metal shield and then solder it back on when they are done. The choice is yours. |
|
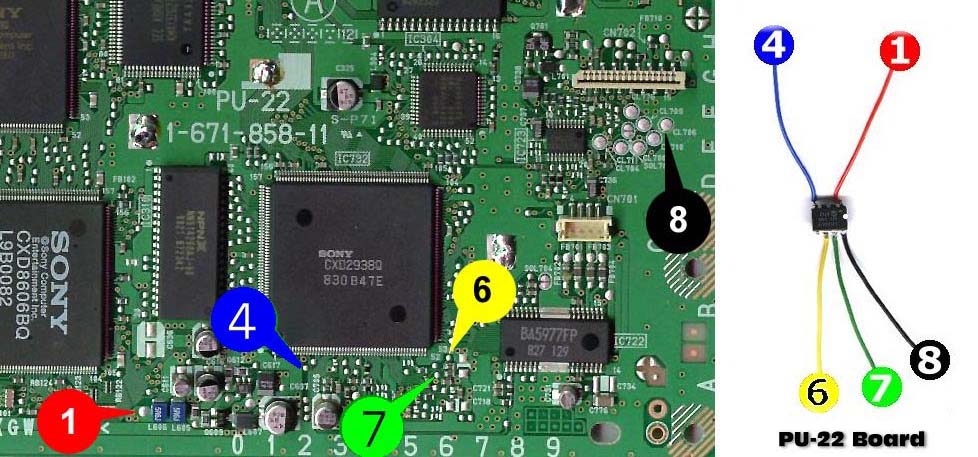
| Now just solder the wires to the points according to the picture below, make sure you match up each Pin Number with the appropriate Numbered Solder Point by looking at the numbers in the arrows. A good soldering method is to very lightly coat the wire with solder, then let your soldering iron heat up, hold the wire to the spot to solder, and then touch the wire with your iron. It should fuse with the spot immediately. Remove the iron and let it cool, and your connection is done. |
|
| Check each solder point after soldering to make sure no two spots are touching. This will cause a short and can ruin the playstation. Use a magnifying glass to get a real good look. If you find a short, you will need to clean it up before you power your playstation on. |
SCPH 7501/7502:
(The 750x series has the chip installed on the TOP of the board, the lower right hand corner)
Click here for the 4 wire installation method (Suggested).
The image below is too wide to print on a standard 8.5x11 paper, so if you print it, please make sure you do it in landscape mode. Also, if you are viewing in your browser, make sure you scroll to the right so you do not miss where the black connection is.
The numbers on the arrows represent which pins on the MOD Chip that point needs to be soldered to.
Once you have soldered all the points, make sure all your connections are good and that you have not accidentally connected any adjacent points.
Cover the Mod Chip and any visible pins and wire with electrical tape. Also put tape over the solder points just to isolate it from the bottom of the PSX and cut down the chances of a short.
You can tape the chip to the board using electrical tape, or if you like double sided tape.
Reassemble your PSX and make sure the mod chip and wires do not get caught or crimped.
Also make sure that all connections to the laser unit and circuit board are replaced correctly.
YOU'RE DONE!
As long as you've followed the instructions carefully, you will have no problems.